How-To Configure the AVEVA PI System Connection
What Does This Article Cover?
Intelligence Hub includes a configurable Connection that allows Intelligence Hub solutions to exchange data with the AVEVA PI System including Asset Framework and Data Archive. The PI System Connection supports reading and creating PI Assets and PI Points. The process to configure the PI System Connection is provided below. These process descriptions assume intermediate level knowledge of the AVEVA PI System. This article covers the following.
- What is PI Asset Framework?
- What is PI Data Archive?
- Installing the PI System Connection Agent
- Upgrading the PI System Connection Agent
- Configuring the PI System Connection
- Configuring a Connection Input
- Other related material
What is PI Asset Framework?
AVEVA PI Asset Framework is software that allows you to model either physical or logical industrial objects. It is typically based on an asset model of your plant that you define for your company. The model consists of elements and attributes. You can model your plant by organizing and structuring the data according to how you work with your company’s process data. The PI System Connection enables Intelligence Hub solutions to leverage the configuration performed in Asset Framework.
What is PI Data Archive?
AVEVA PI Archive is a historian or specialized high speed time series database that stores timestamps and values for process information. The PI System Connection enables Intelligence Hub solutions to to exchange real-time and historical data with the PI Archive.
Installing the PI System Connection Agent:
The Intelligence Hub PI System Connection uses an agent software to communicate with AVEVA PI System. The agent is a separate application and installation in addition to the primary Intelligence Hub application and installation. The agent is a .Net application and it uses the PI System AF SDK to communicate with the PI Asset Framework and Data Archive server. The following are the prerequisites for the host where the agent is installed.
- The host must have a Windows Operating System.
- The PI AF Client must be installed on the host.
- Microsoft .NET 4.8 or greater must be installed on the host.
The following are the steps to install the PI System Connection Agent.
-
Copy the contents of the HighByte-Intelligence-Hub-3.3.0 OSIsoft Agent folder to a folder on the local host machine. In this example C:\IH-3.3.0-ACME_Central\PI_Agent.
-
Run the agent by running the intelligencehub-osisoft.exe or as a Windows service. When running standalone, it’s recommended to run the executable with Administrator permissions. To install as a service, run the following command. The InstallUtil is found in the .NET installation directory: %windir%\Microsoft.NET\Framework64\v4.0.30319\InstallUtil.exe.
In this example C:\Windows\Microsoft.NET\Framework64\v4.0.30319> installutil c:\IH-3.3.0-ACME_Central\PI_Agent\intelligencehub-osisoft.exeinstallutil intelligencehub-osisoft.exe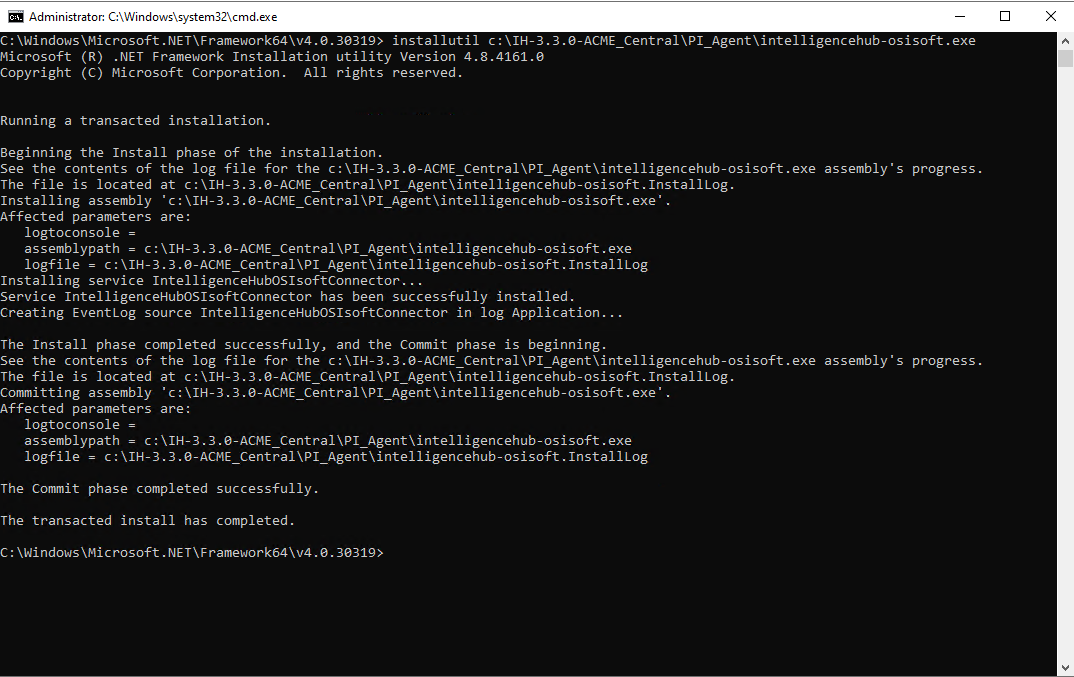
-
The agent opens a port to receive requests from the HighByte Intelligence Hub instance. By default, this communication occurs using secure websockets. On the first run the agent creates a settings.json file. The file contains the port and token. The port controls the port that the agent listens on. This port must be open and available to the Intelligence Hub connecting to the agent. The token is a random security token created by the agent. This token must be applied to the Intelligence Hub PI System connection settings to authenticate the hub. Any changes to these settings require restarting the agent.
{ "port":45290, "token": "randomtoken" } -
On the first run the agent also creates a self-signed certificate called intelligencehub.pfx.
-
The agent connects to the default PI Data Archive Server and Asset Framework Server configured by the AF Client using the PI System Explorer.
Upgrading the PI System Connection Agent
The following are the steps to upgrade the PI System Connection Agent if it has been installed as a Windows Service.
-
Stop the Windows Service.
-
Uninstall the Windows Service. Run the Command Prompt with administrative privileges (right-click and select “Run as administrator”) to ensure the installutil command has the necessary permissions to install/uninstall services. The InstallUtil is found in the .NET installation directory: %windir%\Microsoft.NET\Framework64\v4.0.30319\InstallUtil.exe.
For example C:\Windows\Microsoft.NET\Framework64\v4.0.30319> installutil /u C:\IH-3.4.0-ACME_Central\PI_Agent\intelligencehub-osisoft.exe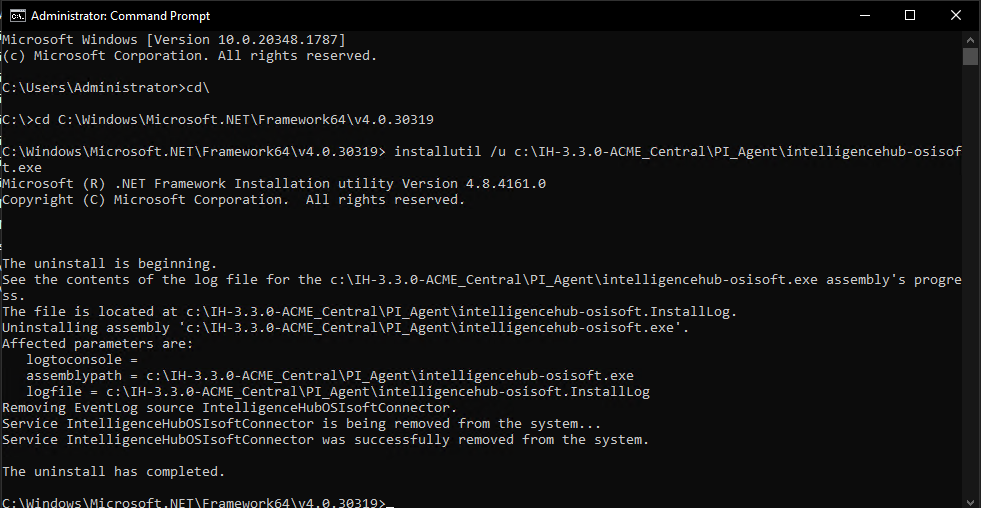
-
Copy the new files into the directory and do not replace these existing files intelligencehub-osisoft.exe.config and settings.json.
-
Install the new Windows Service using the steps described previous.
Configuring the PI System Connection:
Follow these steps to configure communication between Intelligence Hub and the PI System.
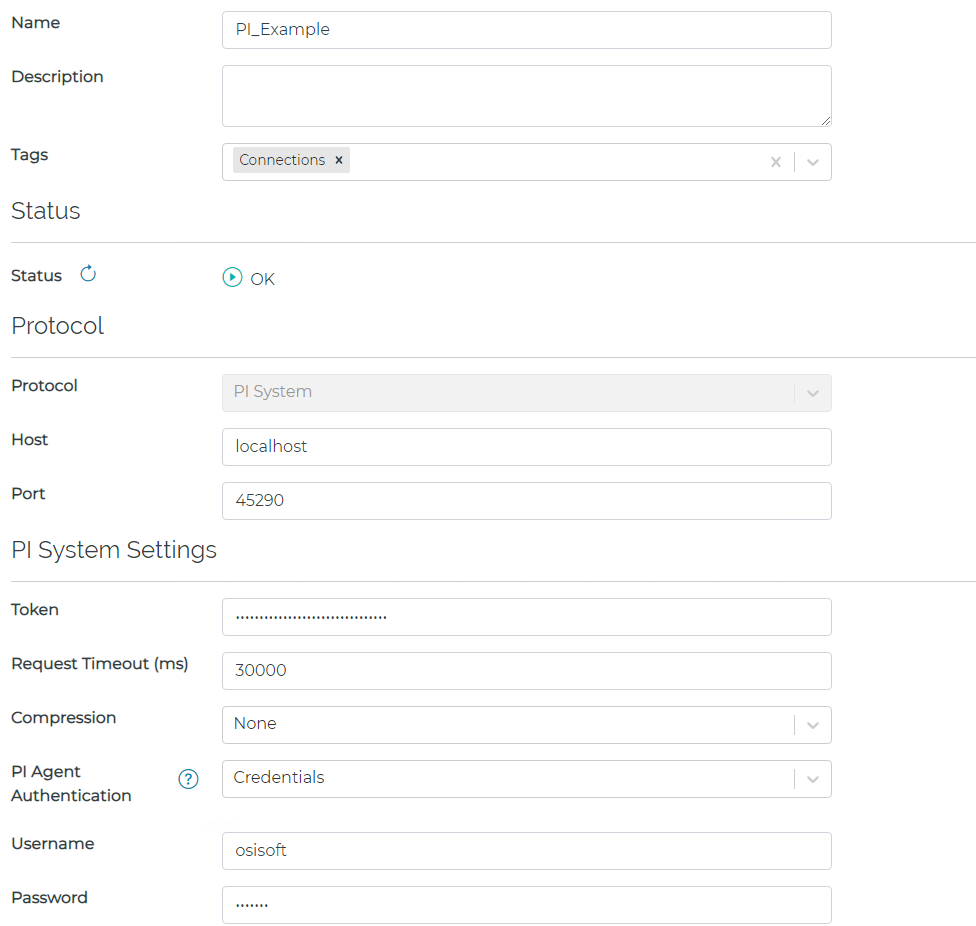
- In the Intelligence Hub PI System connection settings, enter the IP address and port for the agent, as well as the token found in the settings.json file.
- Select the proper value for the PI Agent Authentication setting. If the agent and the PI Server are on the same Windows Domain, select a value of “Windows” for the setting. In Windows mode the PI Agent authenticates with the PI Server using the Windows credentials used to run the agent. If the agent and PI Server are on different domains then select “Credentials” mode and enter the username and password for the PI System. This mode passes the provided username and password to the PI Server for authentication.
- At this point connectivity can be verified by browsing the Asset Framework databases and creating an Input.
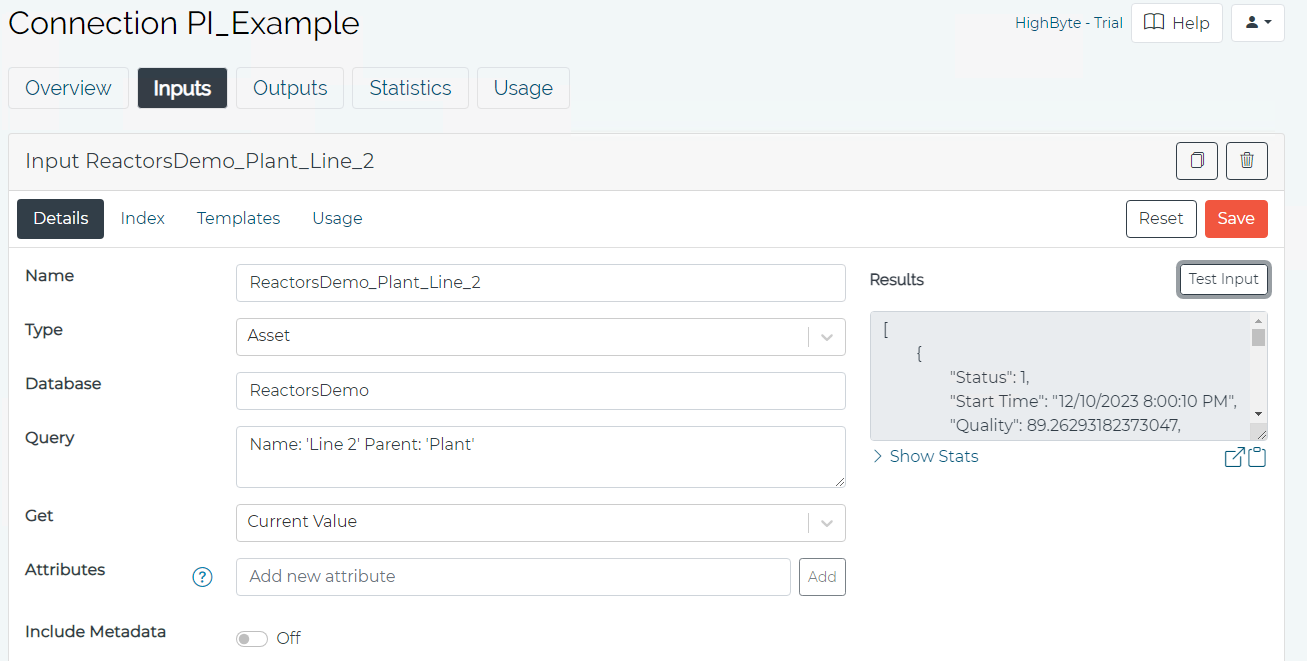
Configuring a Connection Input:
The Intelligence Hub PI System Connection supports reading and creating PI Assets and PI Points. The following is a simple configuration example of obtaining current values for an PI Asset Framework asset name “Line 2”.
- Select the Input tab and press the Browse button. Select a database and an Asset.
- Select “Current Value” for the Get option.
- View data using the Test Input button.